
Bonsai hurdles for beginners
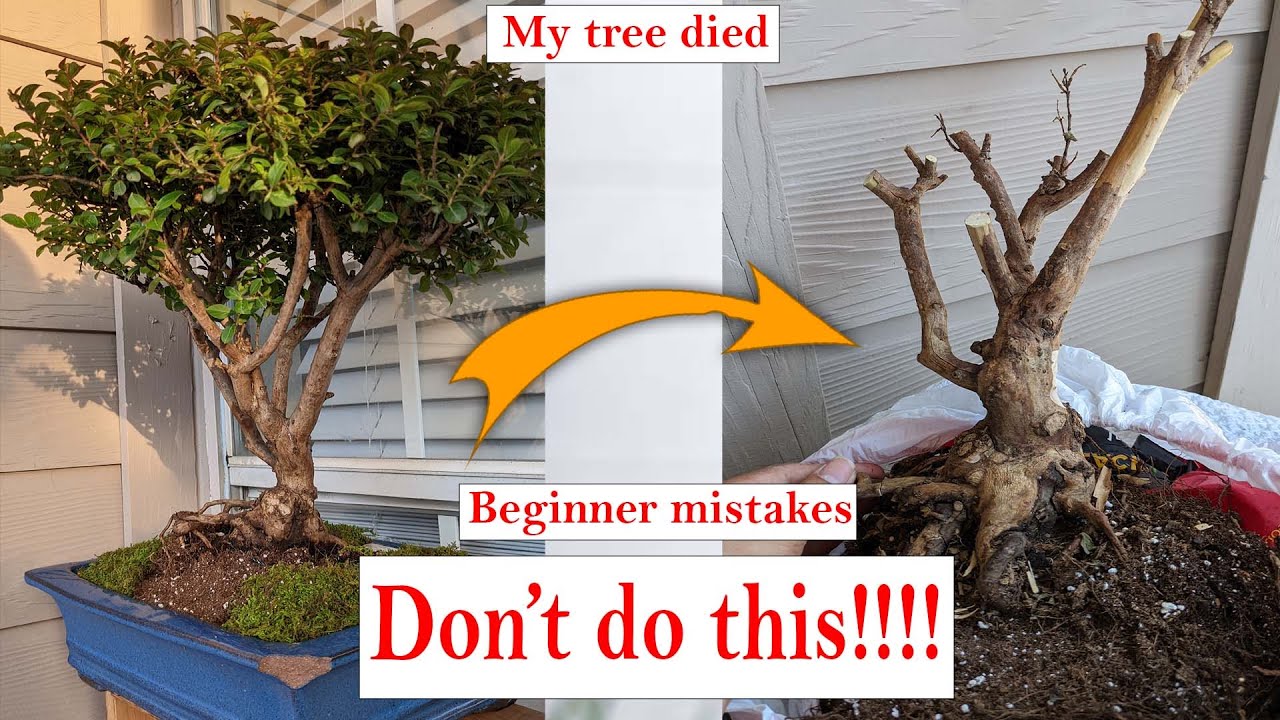
The first year with a bonsai is usually a mess of trial and error. Most people kill their first tree because they treat it like a houseplant rather than a tiny ecosystem. It isn't a lack of care; it's just that trees are less forgiving than succulents.
In 2026, we have more information available than ever before – a blessing and a curse. While access to advice is easier, so is access to misinformation. This article is designed to cut through the noise and address the most common mistakes I see beginners make, helping you establish a strong foundation for success. We’ll focus on practical advice, grounded in established bonsai principles.
Don’t feel discouraged if you encounter problems. Bonsai is a skill honed over time, and every setback is a lesson learned. Consider it an ongoing conversation between you and your tree, a process of mutual adaptation and understanding. A little knowledge upfront can save a lot of heartache down the road.
Picking the wrong tree
One of the biggest errors I see is choosing a tree based on aesthetics alone, without considering its needs. The impulse buy – a beautifully styled ficus or jade plant – is common, and they can work, especially indoors. However, these aren't always the easiest for beginners. Ficus, for example, needs very consistent conditions and can be susceptible to root problems if overwatered. Jade, while drought tolerant, can become leggy and lose its form without careful pruning.
A better starting point is a species known for its resilience and adaptability. Chinese elms are incredibly forgiving and can tolerate a wider range of conditions. Japanese maples are stunning, but require more attention to watering and protection from harsh afternoon sun. Junipers, while popular, can be sensitive to overwatering and need full sun. Before you buy any tree, thoroughly research its native environment.
Check your local climate before buying. A larch won't survive a Miami summer, and a tropical ficus will die in a Chicago winter if left outside. You have to match the tree to your backyard. The Central Florida Bonsai Club handbook is a good resource for specific species requirements if you're in the Southeast.
Don't be afraid to start with a nursery-grown tree. These are often more robust and easier to care for than trees collected from the wild. You can then gradually move towards more challenging species as your skills develop.
The overwatering trap
Overwatering kills more trees than anything else. When the soil stays soggy, the roots can't breathe and they start to rot. By the time you see the leaves wilting, the damage is usually done.
The symptoms of overwatering can mimic those of underwatering (wilting leaves, dry soil), which adds to the confusion. The key is to check the soil moisture before watering. The finger test is a good starting point: insert your finger about an inch into the soil. If it feels damp, don't water. A chopstick inserted and removed can also give you a quick reading.
The composition of your soil is also critical. A well-draining bonsai soil mix should contain ingredients like akadama, pumice, and lava rock. These materials allow water to flow through quickly, preventing the roots from sitting in saturation. Avoid using standard potting soil, as it retains too much moisture. Proper soil is the foundation of healthy roots.
Sunlight is more than just a window sill
The advice to place your bonsai in "bright indirect’ light is incredibly vague and often insufficient. What constitutes ‘bright indirect" varies drastically depending on your location, the time of year, and the type of tree. Many beginners underestimate the amount of sunlight their bonsai actually needs.
Different species have different light requirements. Junipers and pines, for example, need at least six hours of direct sunlight per day. Maples can tolerate some afternoon shade, but still require several hours of direct sun. Ficus can thrive in bright indirect light, but may become leggy if they don’t receive enough light.
Assess the light levels in your home or garden. Use a light meter app on your smartphone to get a more accurate reading. If you’re unable to provide sufficient natural light, consider supplementing with grow lights. LED grow lights are energy-efficient and can provide the full spectrum of light your bonsai needs.
Pruning without a plan
A common fear among beginners is pruning. They worry about "doing it wrong" and potentially harming their tree. Conversely, some beginners prune too aggressively, removing too much foliage at once. The goals of pruning are to maintain the tree's shape, promote healthy growth, and develop ramification (branch density).
There are two main types of pruning: maintenance pruning and structural pruning. Maintenance pruning involves removing new growth to maintain the tree's existing shape. Structural pruning involves removing larger branches to reshape the tree or correct imbalances. Always use sharp, clean pruning shears to make clean cuts.
Avoid "topping’ trees indiscriminately – simply cutting off the top growth. This can lead to unsightly, unnatural growth patterns. Instead, focus on selectively removing branches to create a balanced and aesthetically pleasing form. Remember, pruning is a gradual process, and it"s better to prune a little at a time than to remove too much at once.
- Buy a pair of dedicated bonsai shears instead of using kitchen scissors.
- Start with small, selective cuts.
- Don't cut the top off the tree to control height; it ruins the taper.
- Research the specific pruning needs of your species.
Fertilizing Fumbles: Too Much, Too Soon
Fertilization is essential for healthy bonsai growth, but it’s easy to overdo it. Over-fertilizing can burn the roots and damage the tree. Understanding NPK ratios (nitrogen, phosphorus, potassium) is important. Nitrogen promotes leaf growth, phosphorus supports root development, and potassium enhances overall health.
The ideal NPK ratio will vary depending on the tree's growth stage and species. During the growing season (spring and summer), a balanced fertilizer (e.g., 10-10-10) is generally recommended. In the fall, a fertilizer with a lower nitrogen content can help prepare the tree for winter dormancy. Organic fertilizers, like fish emulsion or seaweed extract, are gentler and less likely to burn the roots.
Avoid fertilizing stressed trees – those that are recently repotted, suffering from pests or diseases, or experiencing extreme weather conditions. Always dilute the fertilizer according to the manufacturer's instructions. Less is often more when it comes to bonsai fertilization.
Repotting Regret: Timing and Technique
Repotting is often the most daunting task for beginner bonsai owners. It seems risky, and the fear of damaging the roots is understandable. However, repotting is essential for refreshing the soil, providing the tree with nutrients, and preventing it from becoming root-bound. The timing of repotting is crucial and varies by species.
Generally, deciduous trees are best repotted in early spring, before they break dormancy. Evergreen trees are typically repotted in the fall, after the growing season. The process involves carefully removing the tree from its pot, gently teasing apart the roots, and pruning any circling or damaged roots. Use a sharp, clean pair of root pruning shears.
The soil mix used for repotting is just as important as the technique. A well-draining mix is essential to prevent root rot. Handle the roots with care, avoiding excessive damage. After repotting, water the tree thoroughly and protect it from extreme temperatures. Careful preparation and a gentle hand are key to successful repotting.
Ignoring Pests and Diseases
Beginners often underestimate how quickly pests and diseases can take hold on a bonsai tree. Regular inspection is vital. Common pests include spider mites, aphids, and scale. These can be identified by visible webbing, sticky residue, or small bumps on the leaves and stems.
Treatments range from insecticidal soap to horticultural oil. For fungal diseases, such as root rot, good air circulation and proper watering are essential preventative measures. If you suspect a disease, isolate the affected tree from others to prevent it from spreading.
Preventative care is always the best approach. Ensure your bonsai has adequate air circulation, avoid overwatering, and keep the foliage clean. A healthy tree is more resistant to pests and diseases. Don't wait until the problem is severe to take action!
No comments yet. Be the first to share your thoughts!